Advanced settings
Quelea holds a few additional settings that on one hand require a bit more work from the user to set up, but on the other hand allows you to fine-tune Quelea for your needs.
VLCARG
VLCARG is a feature that lets you pass argument to VLC, which means that you can basically adjust the video in any way you want. It also means that you could use live video in Quelea, even as a background video if you would like, which is what we will cover here. For more options, read the VLC wiki, and feel free to discuss it at the Quelea forum.
Using VLCARG to set up live video background
The easiest way is probably to fire up VLC, go to media, and then click on “Open capture device”. You will see something like this:
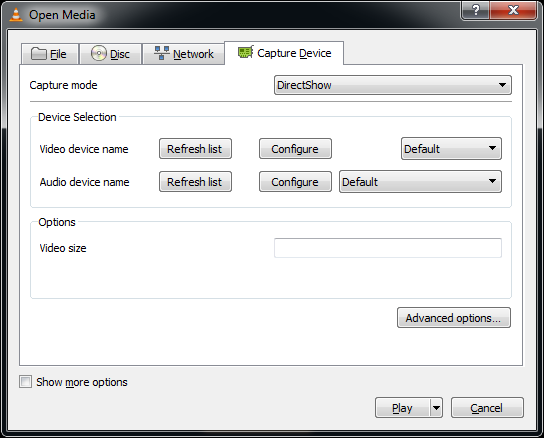
You can then select whatever you want - for this example we will use the web camera connected to the computer and set the maximum size to 640x480. Once you are done, hit the “Show more options” checkbox in the bottom left:
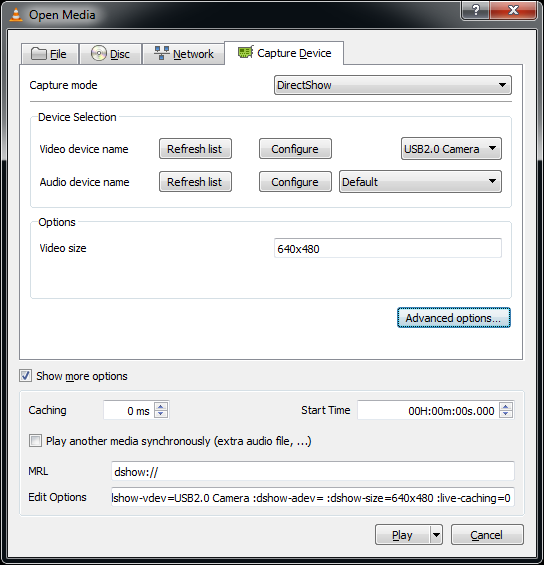
You will see two text fields at the bottom, “MRL” and “Edit Options”. Take note of these values. (You may also want to hit “Play” right away to make sure these options work - if they don’t work in VLC directly they won’t work in Quelea!)
Next, create a blank text document and open it in notepad (or Notepad++, or your favourite plain text editor, but not MS Word or the like!) Paste the contents of the MRL field into the first line of the text file, and paste the contents of the “Edit Options” field into the second line.

Save the file, quit notepad and then change the “.txt” extension to “.vlcarg”. Quelea should then pick it up as a video file, and pass on the MRL and options you specified to VLC directly. This means you can add the file you just created as a video background (see Video background). Note that Quelea will save a copy of the file you created in the Quelea video folder, which means you will need to edit the copied version, not the original that you created, if you need to change the settings.
Manually adding settings
Hidden in the Quelea settings file, you can add a few extra options. Start by going to your user folder (in Windows it’s usually C:\Users\ [username]\). There you have to open the folder named “.quelea” (the dot implies that the folder is hidden in Linux and OS X, and I won’t cover how you un-hide it or access it anyway here, so feel free to search the internet for it – there are a lot of tutorials there). Once you have opened the folder, locate the file called “quelea.properties”. Open this file in a plain text editor, such as Notepad (i.e. not MS Word). There you can add a few extra settings which you find below.
CCLI number
For organisations that have an agreement with the CCLI it is technically required to display the organisation’s CCLI number on all copies of the lyrics. Quelea can display your CCLI number beneath the song and copyright information when the lyrics are live. Simply add the following to quelea.properties, replacing 1234 with your CCLI licence number:
church.ccli.num=1234
Since Quelea version 2021.0 it is possible to add the CCLI licence number via the user options.
Fade in/out adjustments
There is an option to edit the fade in/out duration in milliseconds. So if you are not pleased with the standard duration, these are the lines you need to edit or add:
logo.fade.duration=1000
black.fade.duration=1000
clear.fade.duration=1000

As you can see Quelea uses one second by default, but you can change the number to any amount of time you would like Quelea to use when it fades in to logo, black or clear. A higher number means slower fade (e.g. 2500 = 2.5 seconds) and a lower number means faster (e.g. 500 = 0.5 seconds).
Margins
You can also edit the margins that Quelea uses when it is projecting. Add the following lines and adjust the number to the percentage of the screen you want to use (0.9 corresponds to 90%).
lyric.width.bound=0.9
lyric.height.bound=0.9
Automatically extend projection window to a recently plugged in device
Another setting you can change by editing “quelea.properties” is if you want the projection screen to be automatically extended when you plug in a projector. If you know for sure that you will not use Stage View, this might be a good option in case you have a cable with a glitch or are worried that it might be disconnected in the middle of a service. Without this option, you always need to set up the screen output manually.
To enable this feature, add the following line to the properties file.
use.auto.extend=true
Adjust fade transition speed
If you have activated the setting Use fade transition between slides and you are not pleased with the default behaviour, you can adjust the settings with the following lines. The time values are in milliseconds.
slide.transition.duration.in=750
slide.transition.duration.out=400
← Server Settings tab Chapter 5 - Shortcuts and other things that are good to know →